


In the Stage Orange, tennis technique starts to become clearly more important for the first time. Especially talented players can already reach a level in individual areas that corresponds to Playing Level 3/4 in the TennisGate 4-Level System.
At the same time, at this age it is completely normal that not all technical building blocks have developed equally. Some details still need age-appropriate fine-tuning, while other elements are already surprisingly stable, functional, and close to advanced movement patterns.
That is exactly why a differentiated look is worthwhile: not every technical deviation is automatically a mistake. What matters is which movement patterns are already reliable, which adjustments fit the stage of development, and at which points coaches can work on things in a targeted way.
In the following example, we analyse the serve of a very talented young player, born in 2016, who won the German National Youth Championship in 2025. His serve is a very good example of which technical features can already be highly developed in Stage Orange – and where typical age-related development tasks become visible.
ANALYSIS
Starting position – preparation

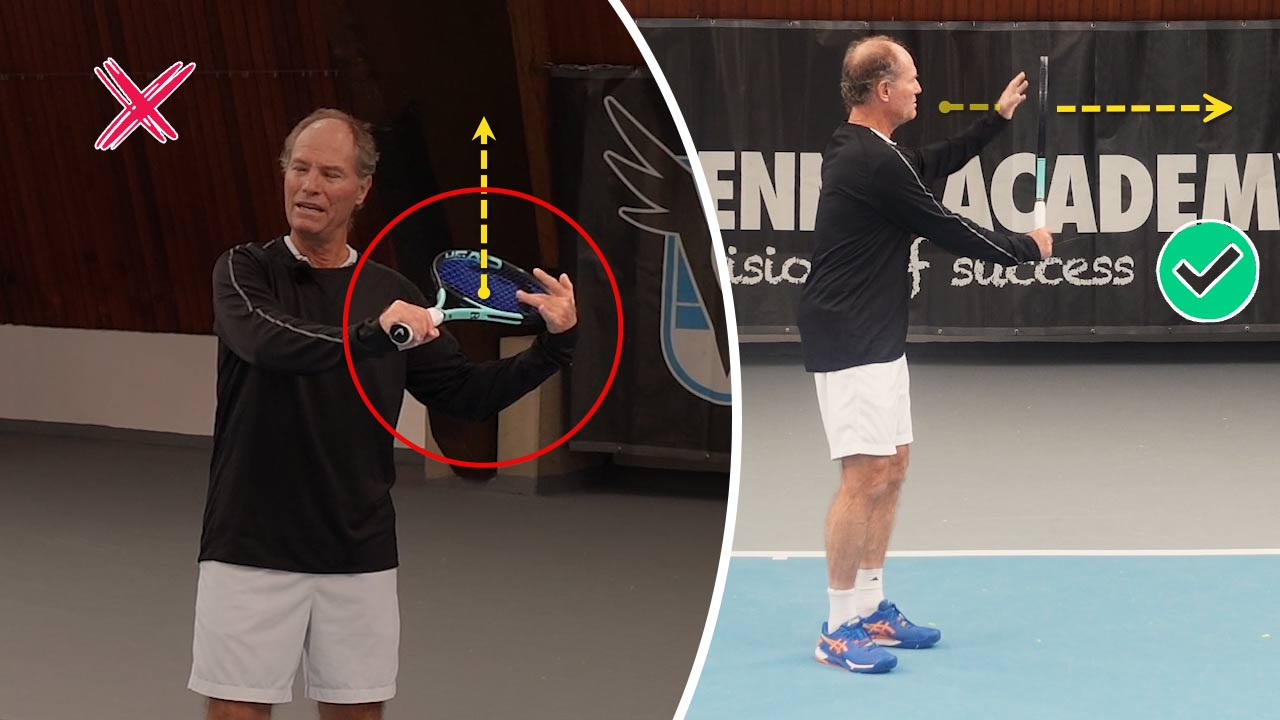
The stance is set sideways, with the left toe pointing toward the right net post. Our 9-year-old junior has not yet fully completed the important transition from a pronounced Forehand grip to the serve grip and is still not holding the racket with the continental grip, but with a slight Forehand grip (Eastern Forehand).
Notice that the upper body and racket are slightly turned to the left. In this development phase, that is absolutely sensible and technically completely fine. This slight pre-rotation allows the player to start the opening movement more dynamically and with more swing, without the ball toss drifting too far to the right afterward.
Coaching Keys
- Build a stable sideways base stance
- Left toe points toward the right net post
- Align the upper body slightly to the left
- Hold the racket relaxed in front of the body
- Do not force a tense “square-up” position
- Find the balance between looseness and stability
- Develop the throwing motion naturally from body rotation
Take-back – toss start

The serve opening starts with a relaxed swinging motion of the arms. Both arms work in opposition and create rhythm early in the entire serve movement. Before the hands even pass the hip, the throwing arm is already actively moving forward and up, while the hitting arm is guided back and up at the same time.

Coaching Keys
- Develop the movement flow loosely and without hurry
- Start the opening with a relaxed swinging motion
- Arms work rhythmically in opposition
- Guide the throwing arm forward and up early
- Move the hitting arm back and up at the same time
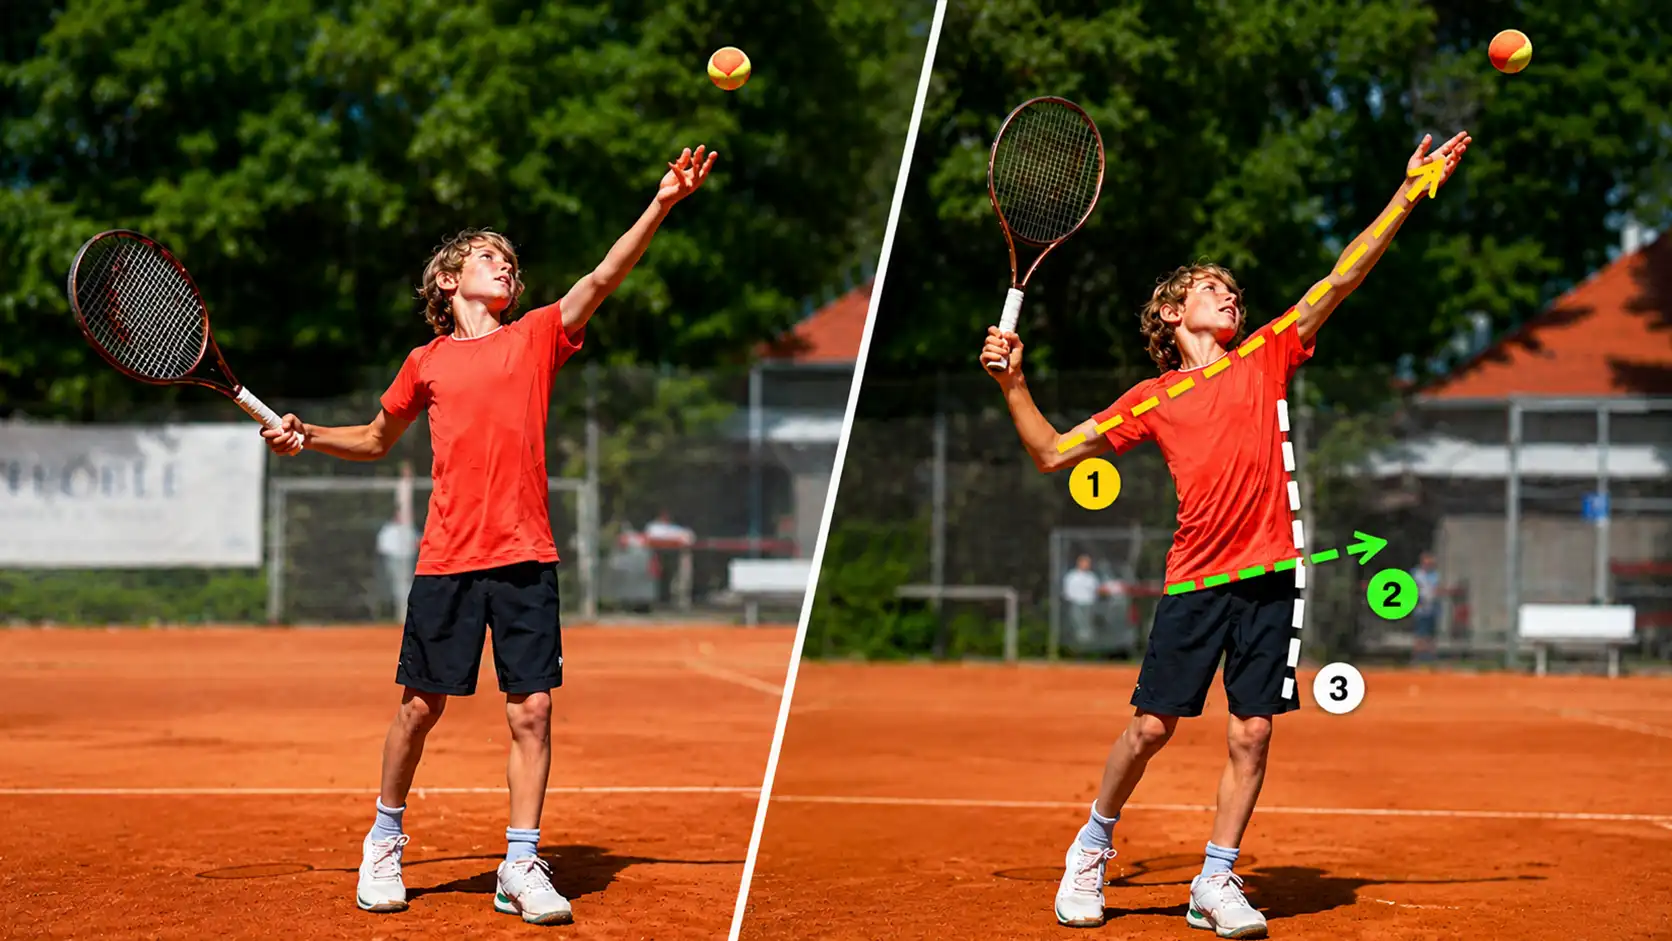
Take-back – Trophy Position

The take-back ends in the key position of the serve: the shoulder tilt, or the so-called Trophy Position. In this position, body tension, balance, and the prerequisites for later acceleration are optimally prepared.
The left arm points straight up and, together with the shoulder axis, forms a diagonal line. This creates a stable alignment upward toward the contact point and at the same time an important preparation for the later rotation of the upper body.
The position of the hitting arm is especially important: the racket head points upward, while the arm forms roughly a 45-degree angle to the ground. This position later makes it easier to accelerate smoothly into the throwing and hitting action.
At the same time, the hips move actively forward. This creates a slight bow tension in the body, acting like a preloaded spring. This exact combination of shoulder tilt, body tension, and stable alignment forms the basis for a dynamic and powerful serve.
Coaching Keys for the Trophy Position
- Build the shoulder tilt actively
- Guide the left arm straight up
- Align the racket head upward in the Trophy Position
- Position the hitting arm at roughly a 45-degree angle
- Push the hips forward actively and create bow tension
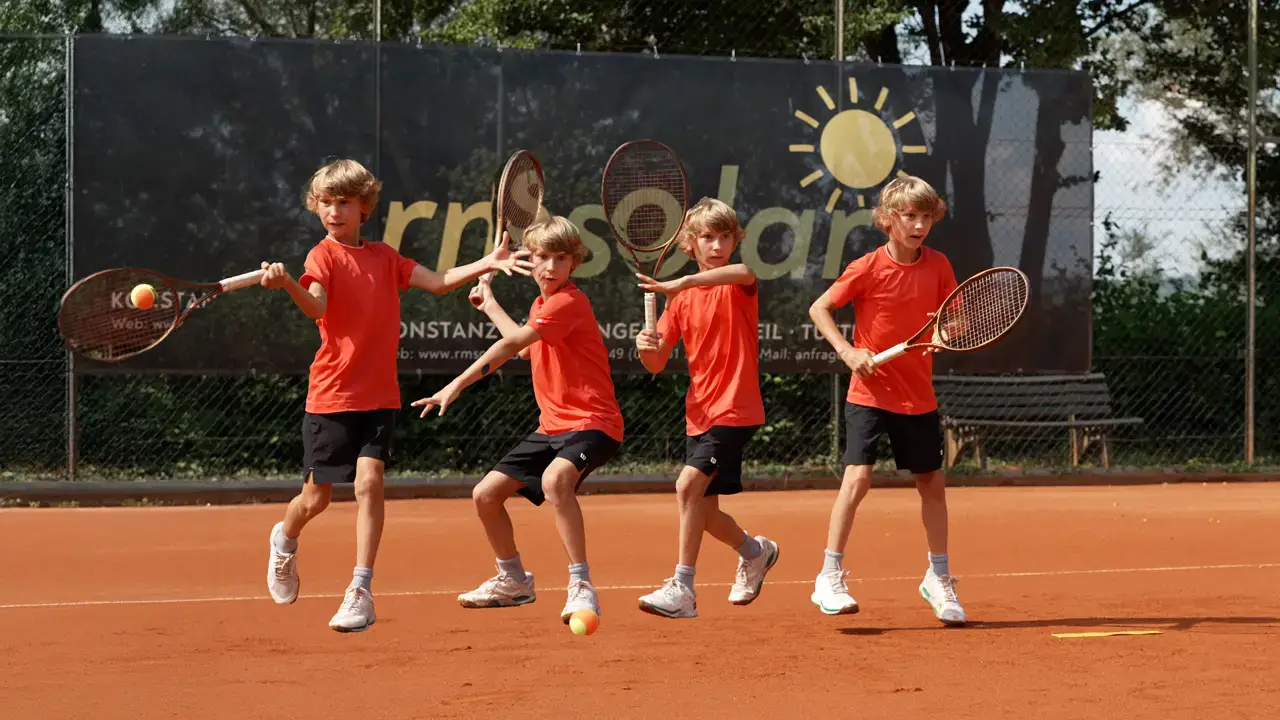
Leg movement – rhythm

Bringing the back foot in, or drawing it up, helps the player bring rhythm and dynamism into the serve. Especially for young players, this movement helps make the sequence smoother and better coordinate the weight transfer.
However, it is important that the back foot is moved forward in a controlled way. Many junior players tend to place the back foot next to the front foot. As a result, the sideways alignment is often lost and the stability of the entire serve movement suffers.
The back foot should therefore remain behind, or slightly diagonally behind, the front foot. This allows the player to control the shoulder rotation, bow tension, and later extension movement much better. The goal is not a big step, but a rhythmic support of the movement sequence with stable body balance.
Coaching Keys for the leg movement
- Control balance and rhythm at the same time
- Draw the back foot forward rhythmically
- Keep the sideways body position stable
- Place the back foot behind the front foot
- Do not “open” the stance by bringing the foot in too far
Reverse movement and racket drop

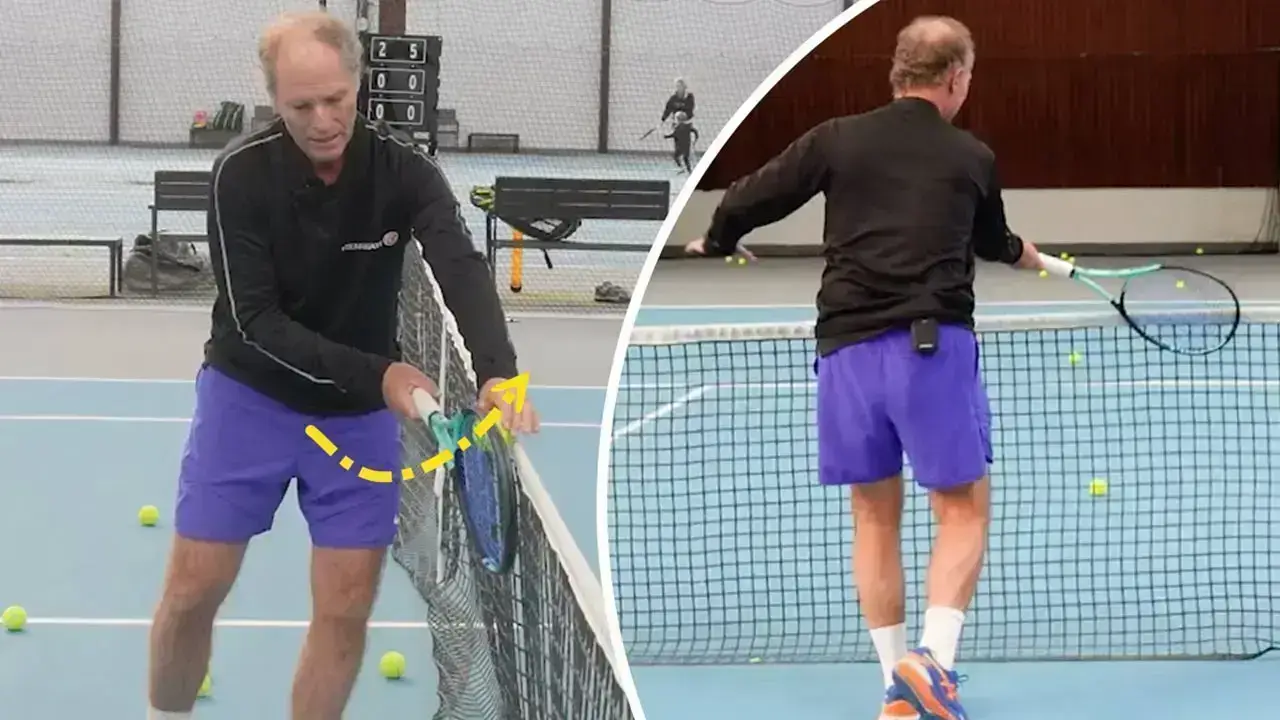
In the reversal phase of the serve, the so-called racket drop, the racket changes from the upward movement into the downward movement. From the highest point of the take-back, the racket is allowed to fall down in a controlled way before the acceleration phase toward the ball begins.
The key here is looseness in the elbow lead. The elbow initiates the movement, while the racket head can sink downward through the relaxed arm and wrist muscles. If the arm is held tense in this phase, the player loses important mobility and therefore also acceleration potential.
Coaching Keys for the reverse movement and racket drop
- Move the elbow loosely and as the lead
- Let the racket head fall down relaxed
- Do not create an active pushing motion downward
- Prioritize looseness over force
- Create a smooth transition into the acceleration phase
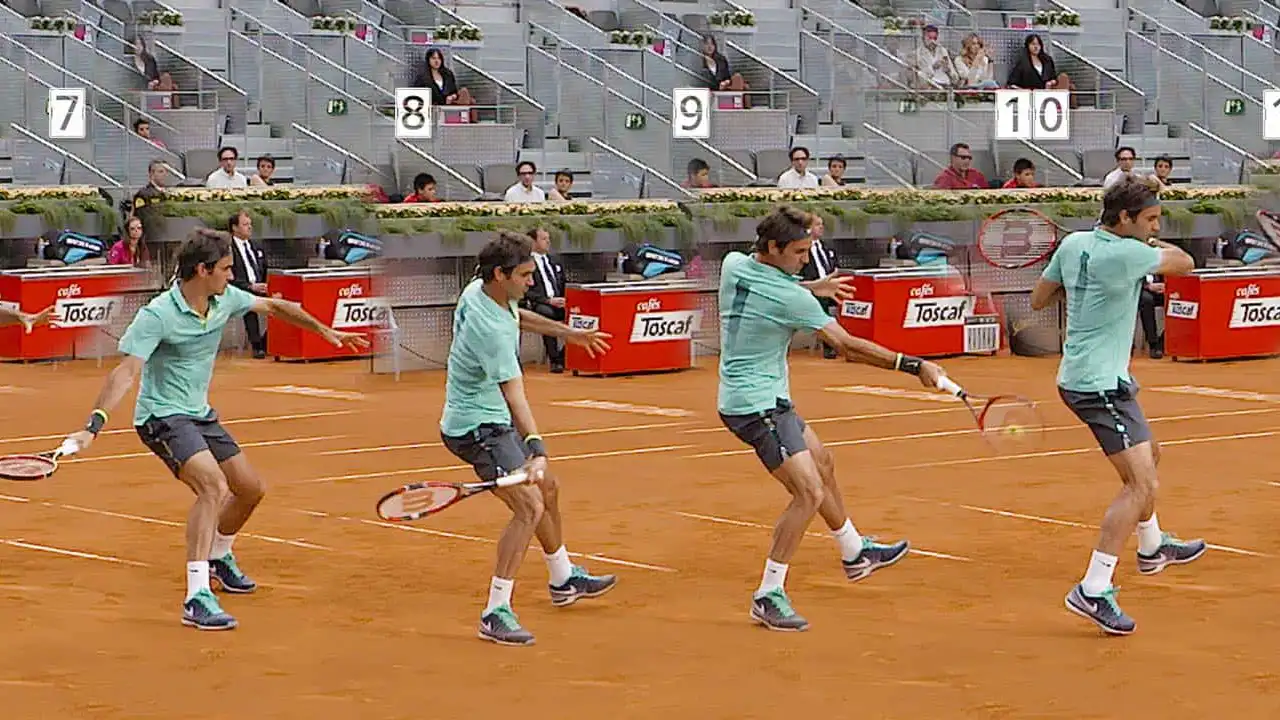
Hitting phase: acceleration

In the acceleration phase, the body tension that has been built up is transferred into movement. The legs push actively off the ground and extend powerfully. This so-called Leg Drive forms the basis for vertical energy development in the serve and supports the entire movement chain upward toward the contact point.
The power does not come from the arm alone, but is transferred through the entire kinetic chain. The movement begins in the legs and continues through the hips, trunk, and shoulder into the hitting arm. The sequence is: hips → shoulder → arm. This coordinated transfer of force allows the player to accelerate the racket efficiently.
In the extension phase, the legs are almost fully stretched upward. At the same time, the racket is in a position where it is aligned almost vertically to the ground. This position shows that the energy is developed upward first, not forward. The vertical energy forms the basis for a high contact point and effective racket acceleration.
Coaching Keys for acceleration
- Push actively and explosively off the ground with the legs
- Develop vertical energy upward
- Accelerate the hips before the shoulder and arm
- Use the kinetic chain: hips → shoulder → arm
- Align the racket almost vertically during the extension phase
Hitting phase and start of pronation

In the hitting phase, the serve reaches its highest racket head speed. A crucial part of this movement is pronation, meaning the inward rotation of the forearm. It is often assumed that this movement is created actively and in isolation from the arm. In reality, however, the start of pronation is prepared and initiated by the rotation of the shoulder axis.
The shoulder axis rotates forward and up, transferring the energy of the entire movement chain to the hitting arm. Pronation therefore emerges as a natural part of the acceleration movement and not as a separate hand or forearm action. Players who try to create pronation actively with the hand often lose looseness, timing, and racket head speed.
The goal is therefore to use shoulder rotation as the driving force and let pronation happen as a result of a smooth, dynamic throwing and hitting movement. This transfers energy efficiently into the contact point and reduces the load on the arm and wrist.
Coaching Keys for the hitting phase
- Allow the shoulder axis to rotate forward actively
- Let pronation emerge from the overall movement
- Do not work in isolation with the hand or forearm
- Guide the hitting arm loosely through the movement
- Transfer energy from the shoulder into the contact point
Contact point

In a direct comparison between a 14-year-old player (left) and the 9-year-old Orange player (right), clear differences in body extension and contact point position become visible.
The key difference lies in the better extension of the 14-year-old player. He uses the entire body chain more effectively, reaches greater upward movement, and can therefore contact the ball from a higher position. The shoulder axis stays tilted longer, the hitting arm extends fully toward the ball, and the contact point is high above the body. Here you can also see that the back right hip is responsible for the vertical energy.
For the 9-year-old Orange player, the body is noticeably more bent at contact. At the same time, the contact point is further in front of the body. As a result, the player loses important height and a favorable hitting angle. Instead of developing energy vertically upward, the movement works more forward. This makes it harder to reach a high contact point and to play the ball into the court with an optimal angle.
Differences also show up at the start of pronation. While the older player already combines shoulder axis, arm extension, and pronation more effectively, this development process is still being built in the younger player.
The comparison makes it clear how important good body extension is for a successful serve. More height at contact usually leads to better angles, more safety over the net, and, in the long run, greater serving potential.
Coaching Keys
- Develop vertical body extension up to the contact point
- Keep the shoulder axis aligned upward for longer
- Fully extend the hitting arm toward the ball
- Aim for a higher contact point rather than a more forward one
- Improve height and angle through body extension
Follow through / pronation

The follow through is the natural continuation of the hitting movement after contact. It shows whether the acceleration that was built up earlier was carried through the ball freely and without interruption. A good follow through does not come from a conscious movement after contact, but as a result of efficient arm and shoulder rotation.
After ball contact, the shoulder axis continues to rotate in the hitting direction (international technical term: long axis rotation). The hitting arm follows this movement and swings through in a relaxed way. The follow through makes it especially clear whether the player was able to maintain the necessary looseness in the arm and shoulder. Tension slows the movement down and reduces both speed and control.
Directional control does not end at contact either. The direction of the follow through gives important clues about how cleanly the energy was transferred through the ball. A fluid follow through in the hitting direction supports movement stability and makes it easier to control the trajectory and placement of the serve.
Coaching Keys for the follow through
- Continue shoulder rotation after the contact point
- Allow the hitting arm to follow through loosely and freely
- Do not create an active braking movement
- Maintain relaxation until the end of the movement
- Execute and control the follow through in the hitting direction
Follow through and landing

The landing is the final part of the serve movement and at the same time the transition into the next game situation. After ball contact and the follow through, the player must absorb the forward momentum in a controlled way and prepare quickly for the next stroke.
Balance plays a central role here. A stable landing makes it possible to absorb the energy of the serve movement efficiently and keep the body under control. Players who lose balance after landing often have trouble reacting in time to the next ball.
At the same time, the forward movement of the body should be used. A good serve does not end statically on the baseline, but with a controlled movement into the court. This allows the player to build pressure more quickly or position themselves optimally for the next action.
Coaching Keys for the landing
- Land stably and in control
- Keep balance after ball contact
- Absorb forward movement actively
- Become ready to play immediately after landing
- Start the recovery early for the next stroke
Recovering the court

Immediately after the landing, the recovery begins. The player shifts focus to the next game situation, stabilizes the position, and prepares for the first stroke after the serve. The quality of the landing therefore directly influences the quality of the following rally.